
Setting up your Company Details #
Much of your onboarding in PayPeople is complete when you define your Company Profile, Multi Organization, Locations, Departments, Shifts, Designations, etc. To set up, navigate by clicking the Setup Module and then Company data on the top menu.
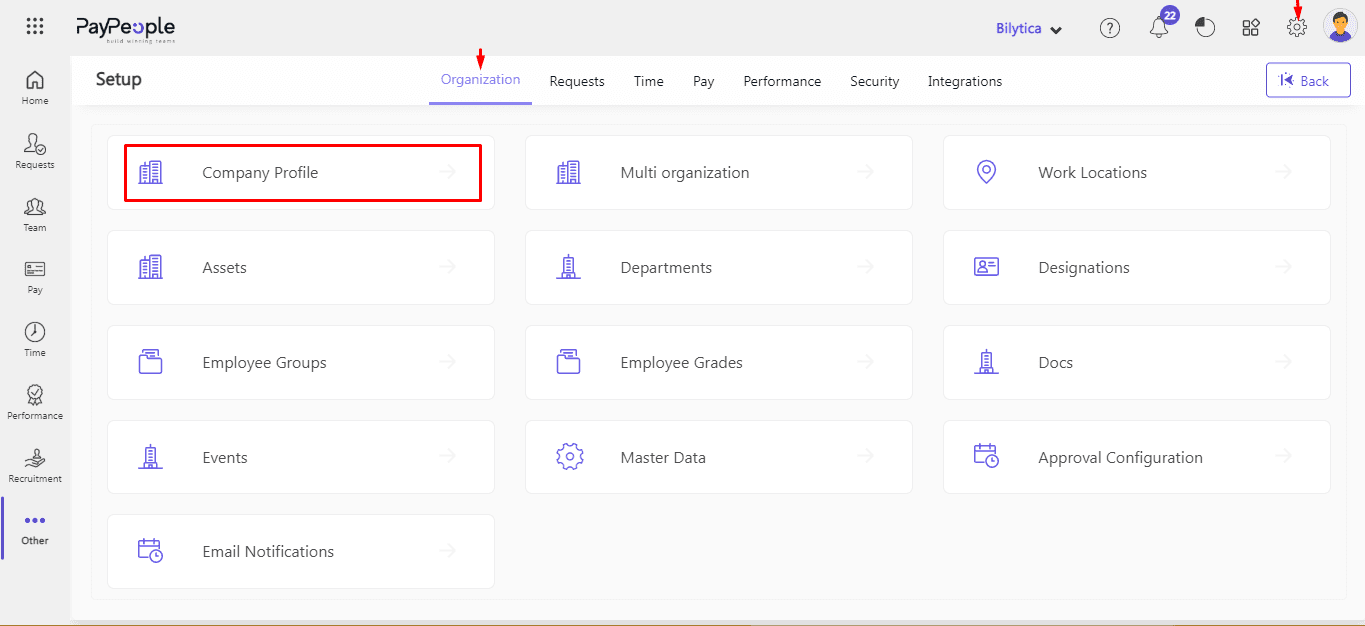
To set up your company details.
- Go to Setup > Organization > Company Profile.
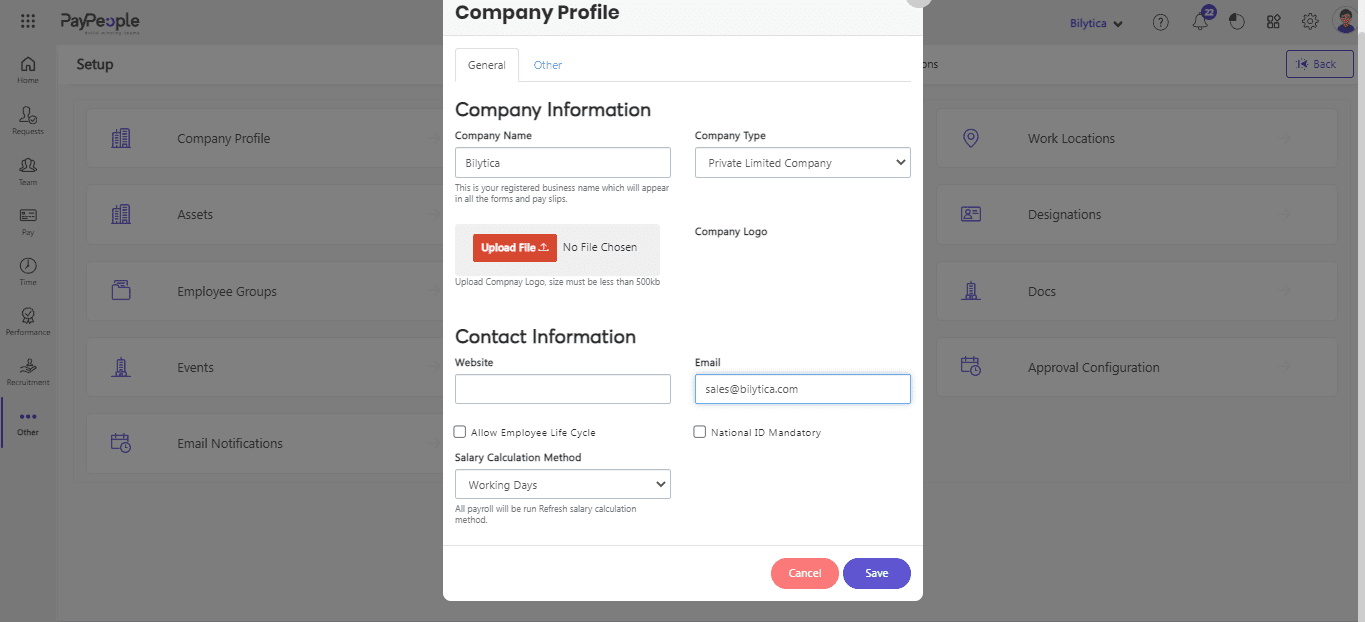
- The Company Profile popup screen will appear which is divided into two sections. i.e. General and Other.
- Go to the General Section.
- Fill in all the necessary details such as your company name , company type, website URL etc.
- Company logo : Upload your company logo and cover image to make your profile look more professional and attractive.
- Allow Employee Life Cycle: If you dont want to allow to anyone to edit employee some mendatory and most import fields.
- National ID Mandatory: Set if a National ID card is mandatory or not.
- Salary calculation Method: Define the salary calculation method either salary will be calculated according to Working Days or Calendar Days.
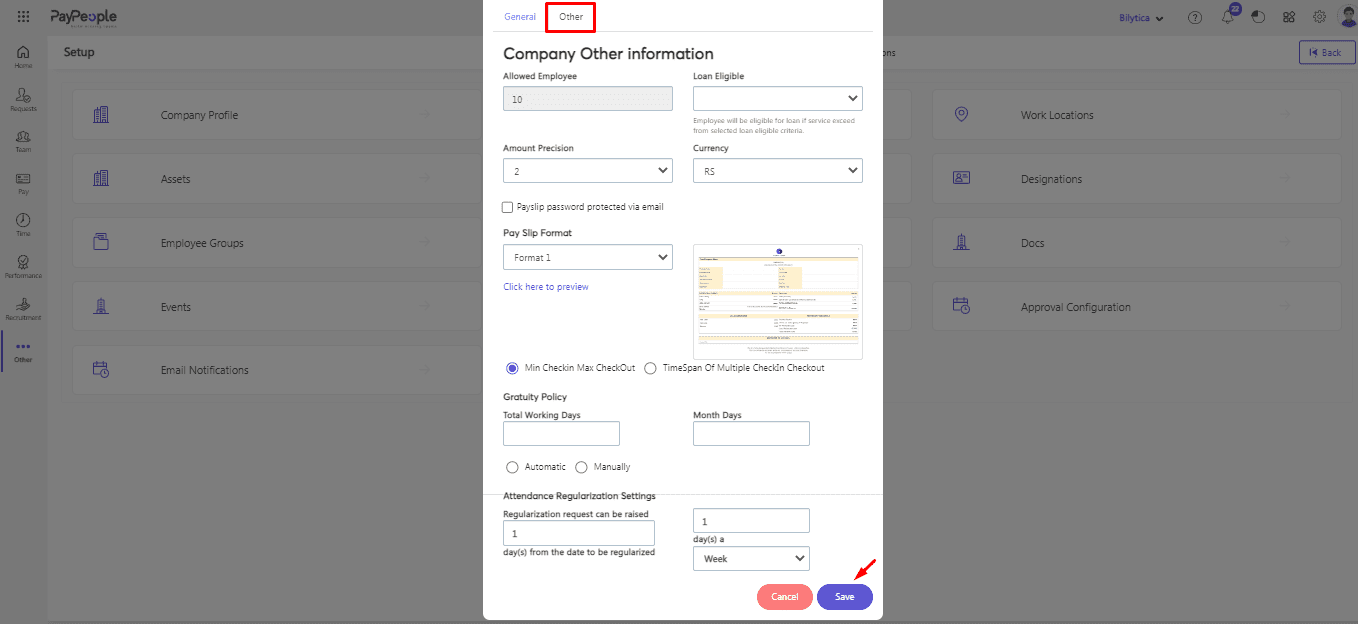
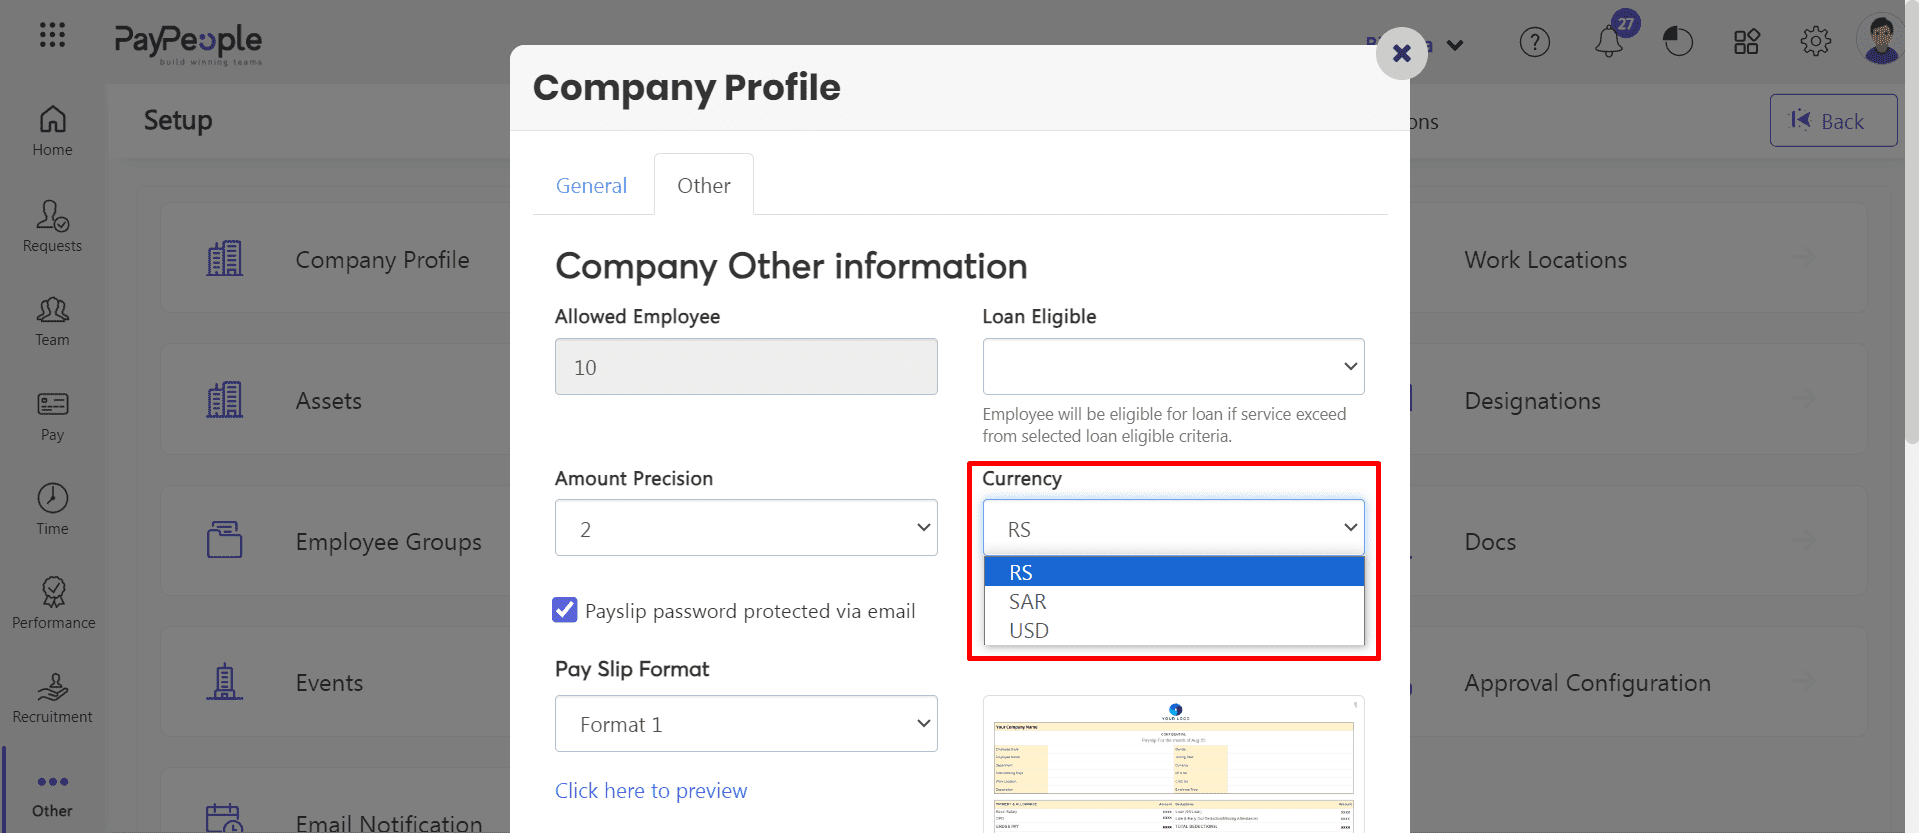
- Now go to Others Sectrion.
- You can set Precision in the amount of money that is paid out to our employees.
- You can set Currency options to ensure that your employees are paid in their preferred currency.
- Set Variety of Pay Slip formats to choose from.
- You can set your company Gratuity Policy.
- Here you can set your company Attendance regulation Policy.
- Finally, click on the “Save” button to save your company profile.
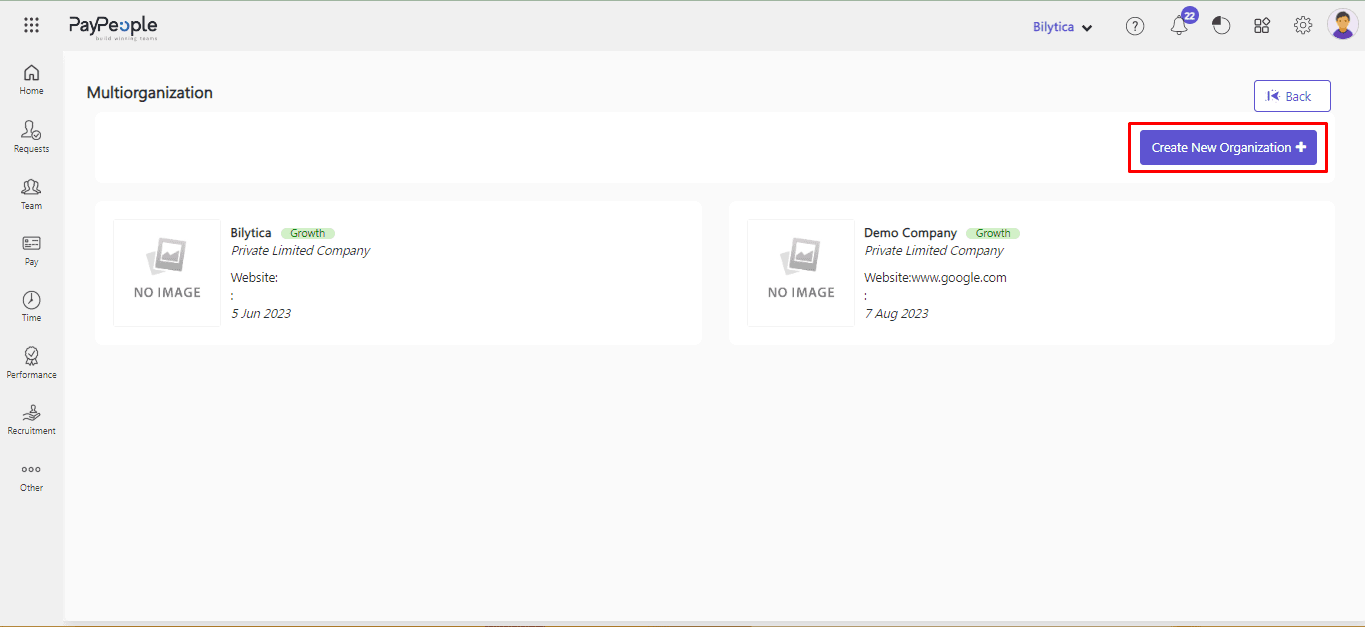
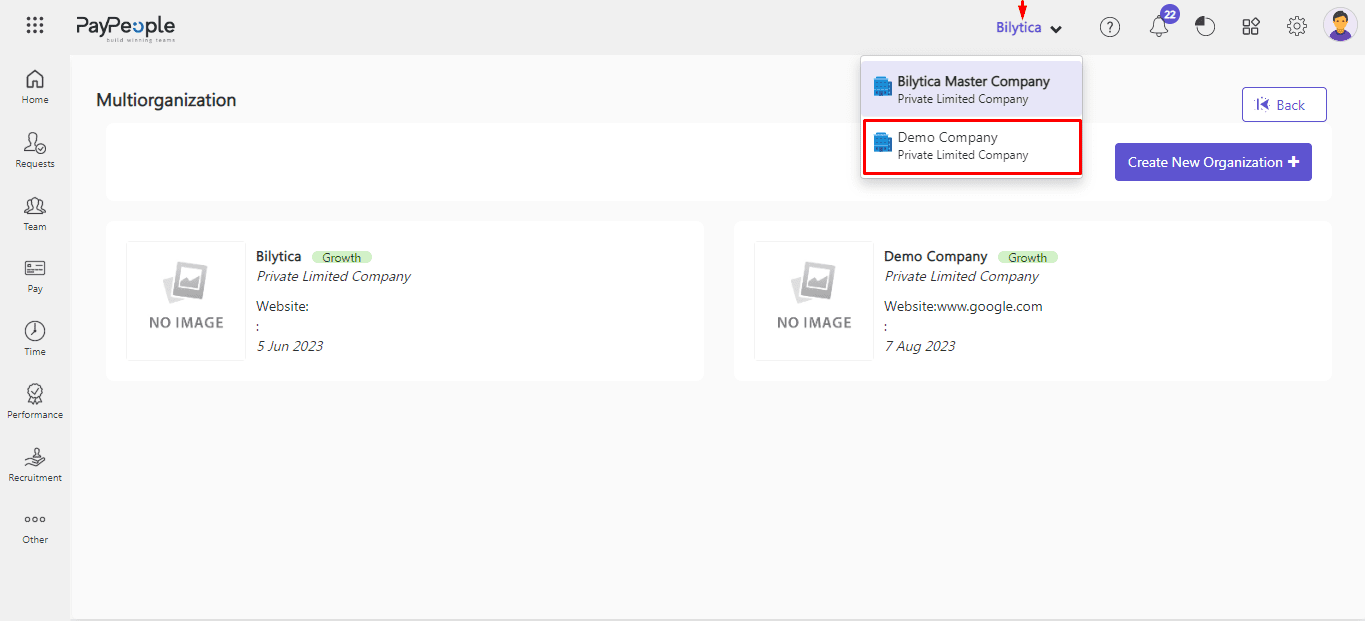
Multi Companies #
Using PayPeople, you can manage multiple organizations using a single email address and password of your PayPeople account. This gets efficient when you operate in multiple organizations with different lines of work. You can manage multiple organizations from one administrator account in PayPeople without having to use different email addresses and passwords.
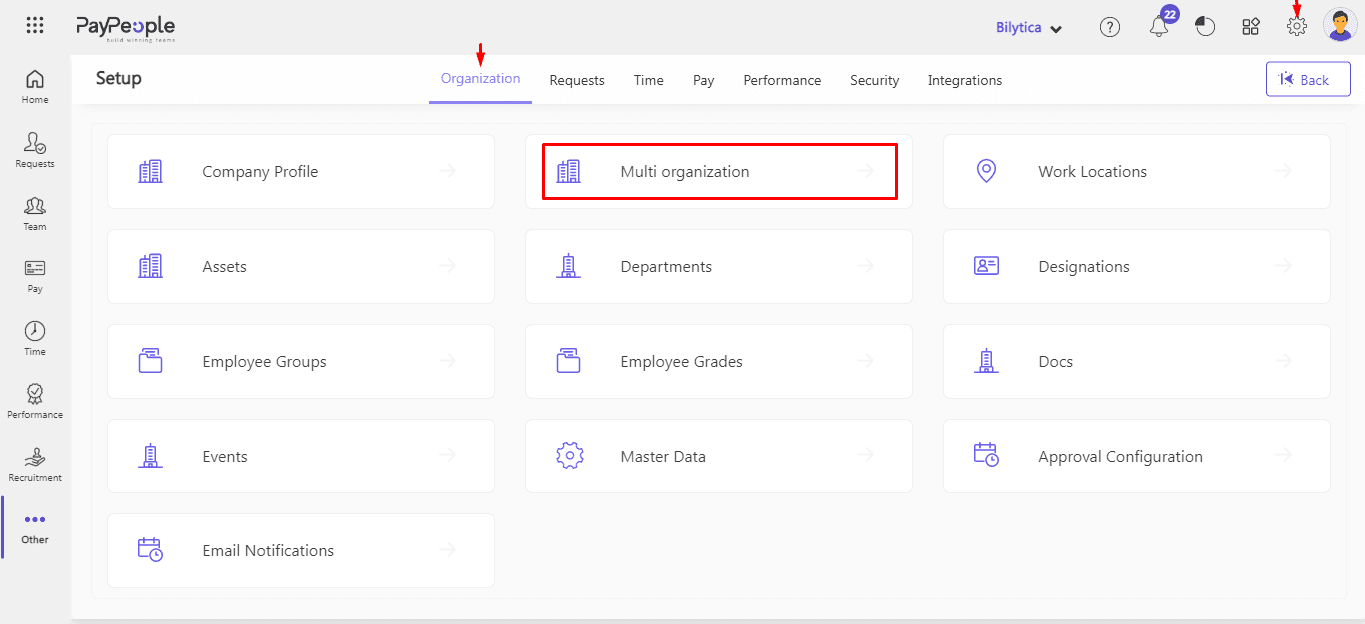
- Click on Setup > organization > Multi organization.
- Click on Create New Organization
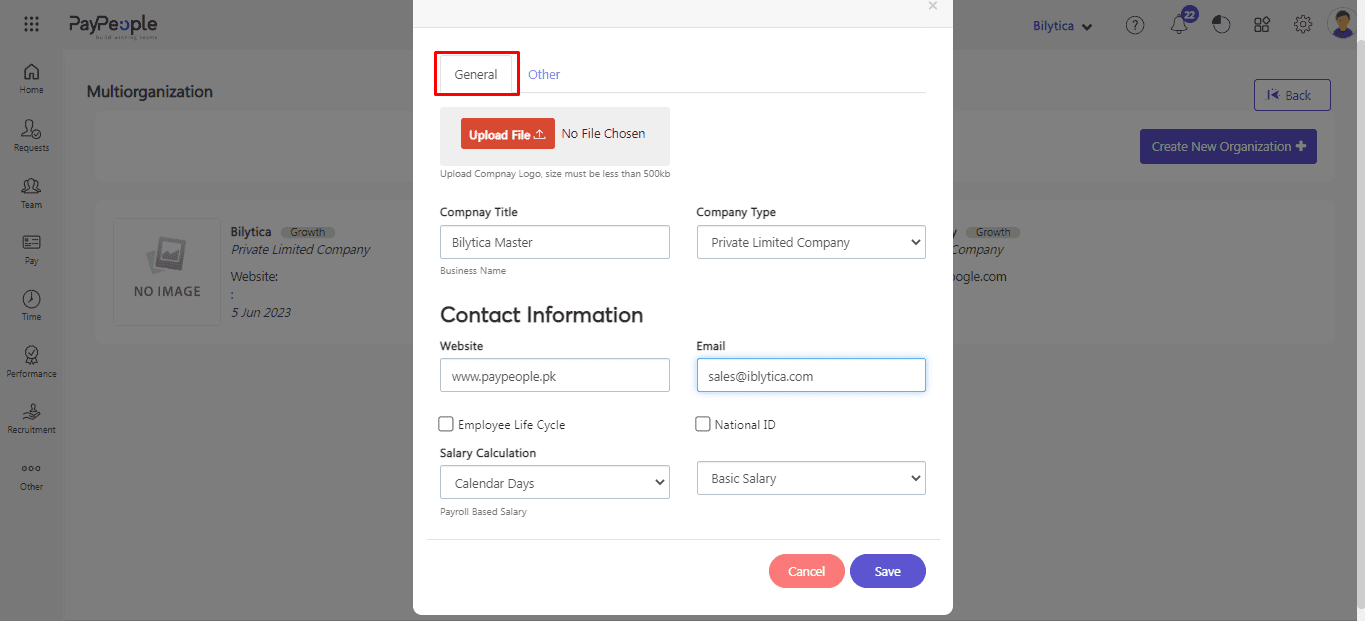
- The Company Profile popup screen will appear which is divided into two sections. i.e. General and Other.
- Go to the General Section.
- Fill in all the necessary details such as your company name, company type, website URL etc.
- Company logo : Upload your company logo and cover image to make your profile look more professional and attractive.
- Allow Employee Life Cycle: If you dont want to allow to anyone to edit employee some mendatory and most import fields.
- National ID Mandatory: Set if a National ID card is mandatory or not.
- Salary calculation Method: Define the salary calculation method either salary will be calculated according to Working Days or Calendar Days.
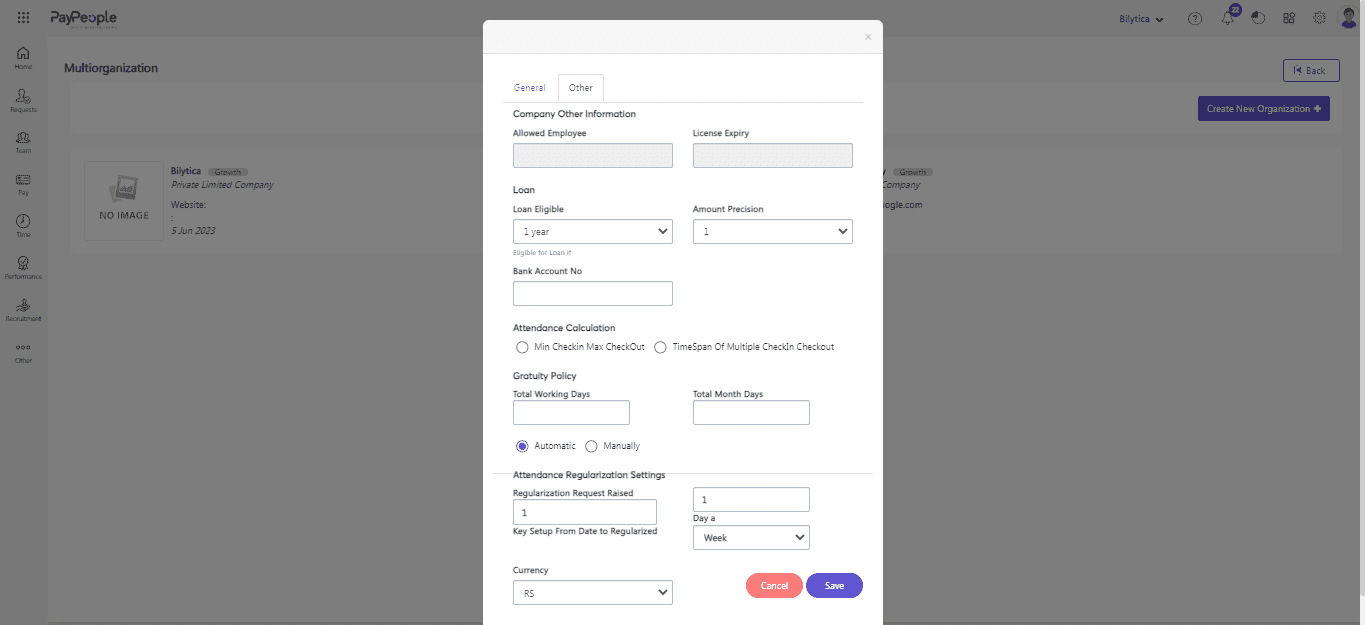
- Now go to Others Sectrion.
- You can set Precision in the amount of money that is paid out to our employees.
- You can set Currency options to ensure that your employees are paid in their preferred currency.
- Set Variety of Pay Slip formats to choose from.
- You can set your company Gratuity Policy.
- Here you can set your company Attendance regulation Policy.
- Finally, click on the “Save” button to save your company profile.
- Your created organization will be visible in the Multi-Organization List.
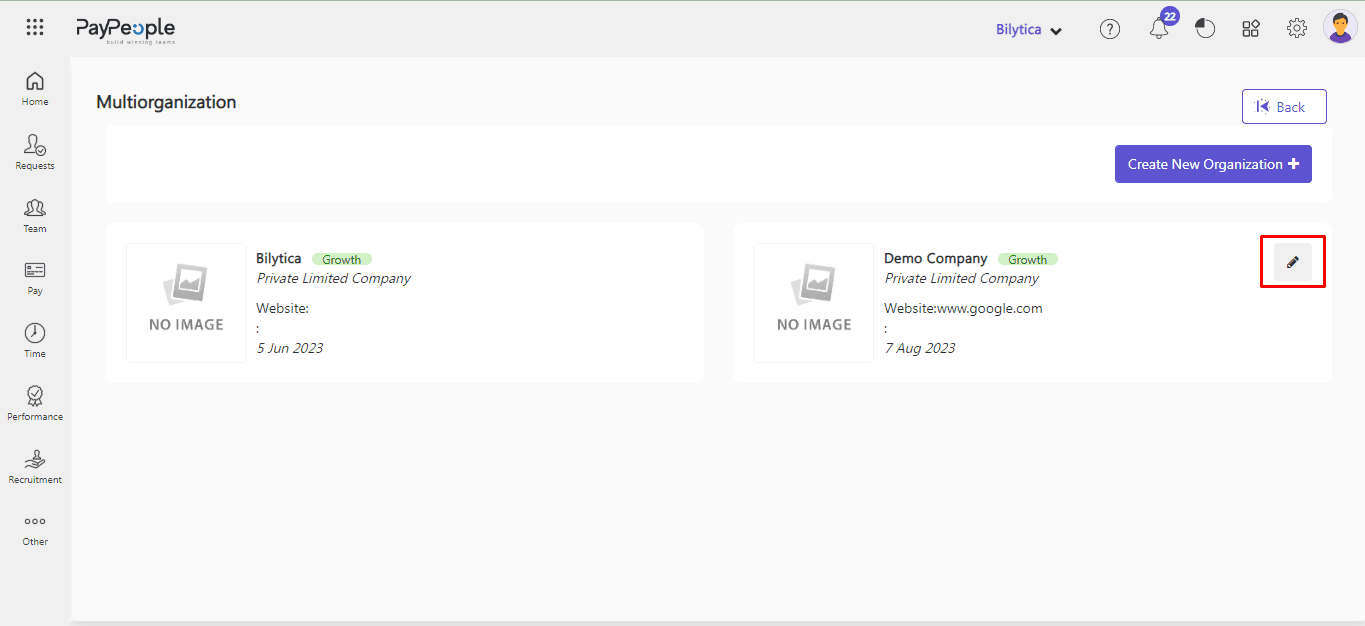
Editing Your Companies #
Editing your company profile in Paypeople is a simple process that can be done in just a few steps. Here’s how to do it:
- Hover on respective organization, edit button will be visible. Click on the “Edit” button located at the top right corner.
- Update the information you want to change, such as your company name, logo, address, phone number, and website.
- Once you have made the necessary changes, click on the “Save” button to save your edits.
- Your updated company profile will now be visible to your employees.
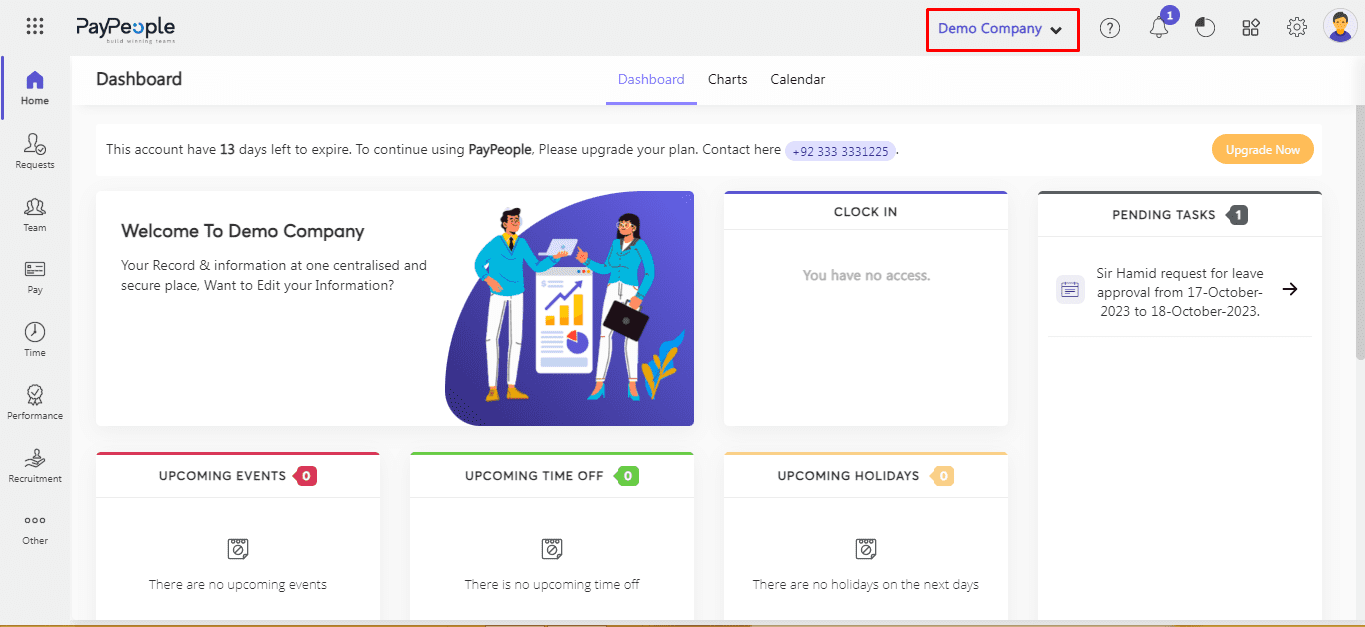
Switch between Companies #
- You can switch your company by click compnay name from the top.
- After click company name drop down menu will be open select company.
- You will be shift to the selected company dashboard.
Transfer Employee From Company to Another #
If you need to transfer an employee from one company to another within PayPeople, it’s a simple process. Here are the steps you need to follow:
- Go to the “Request” tab > Add New Request
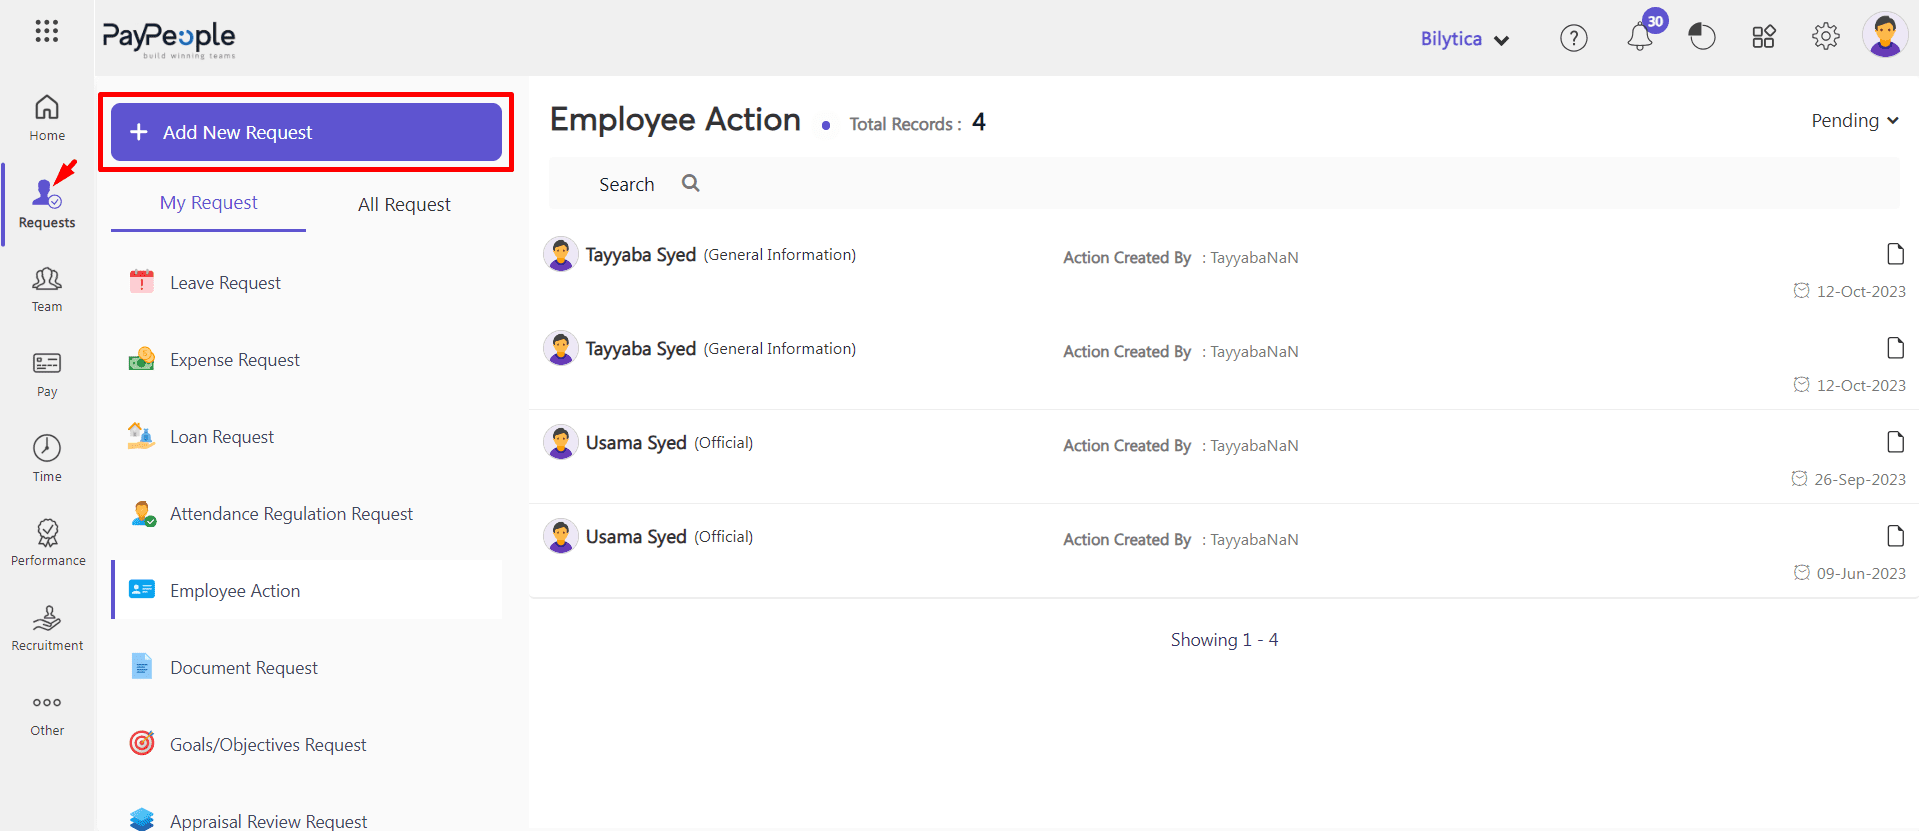
- Click Employee Action
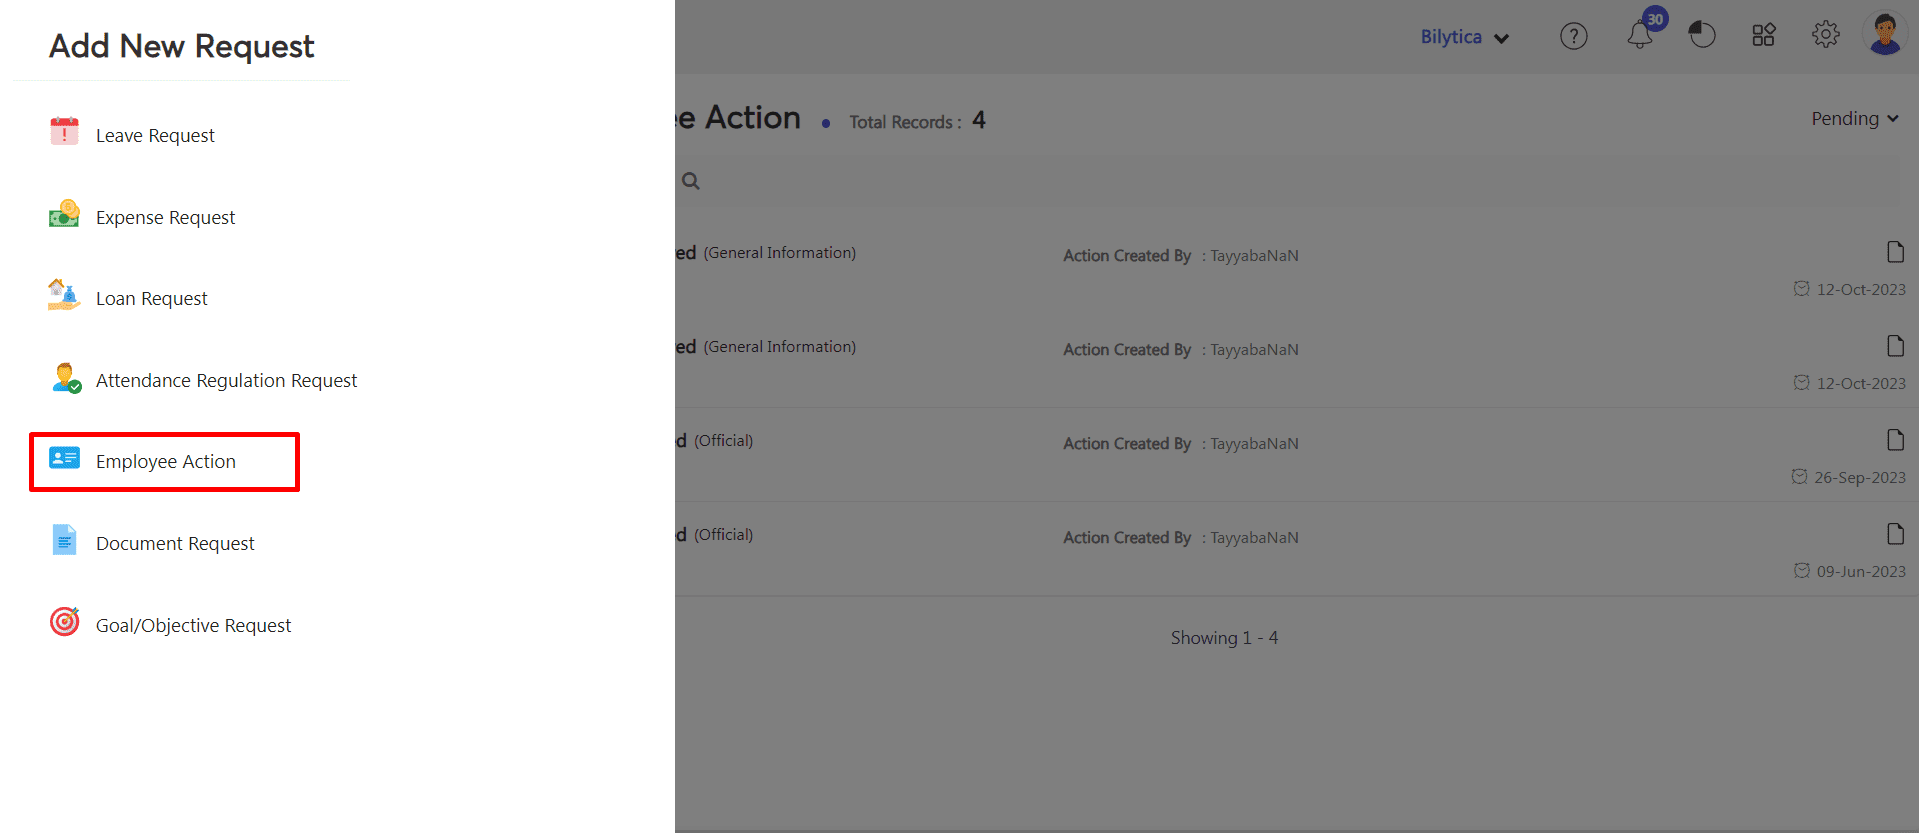
- A pop-up window will appear on the screen. Select Employee Name, check Inter Company Transfer checkbox and select Company where you want to transfer the employee.
![]()
- Three section will be visible to you i.e Personal, Official and Salary for adding employee information.
![]()
- Fill data in Personal section according to your requirements and click Next button.
![]()
- Fill data in Official section according to your requirements and click Next button.
![]()
- Fill data in Salary section according to your requirements and click submitt button.
![]()
- After click submitt button confirmation dialogue will be open on your screen ” Are you sure you want to tranfer this employee to another organzation?“. Click OK button. Employee will be tranfered successfully.
- Once you’ve completed these steps, the employee will be transferred to the new company within PayPeople. Their employment history and other details will be retained in previous company, so you don’t need to worry about losing any important information.
Multi Currency #
You can set different currency for deifferent Paypeople companies. For this,
- Go to Setup > organization > Company Profile
- Click Other
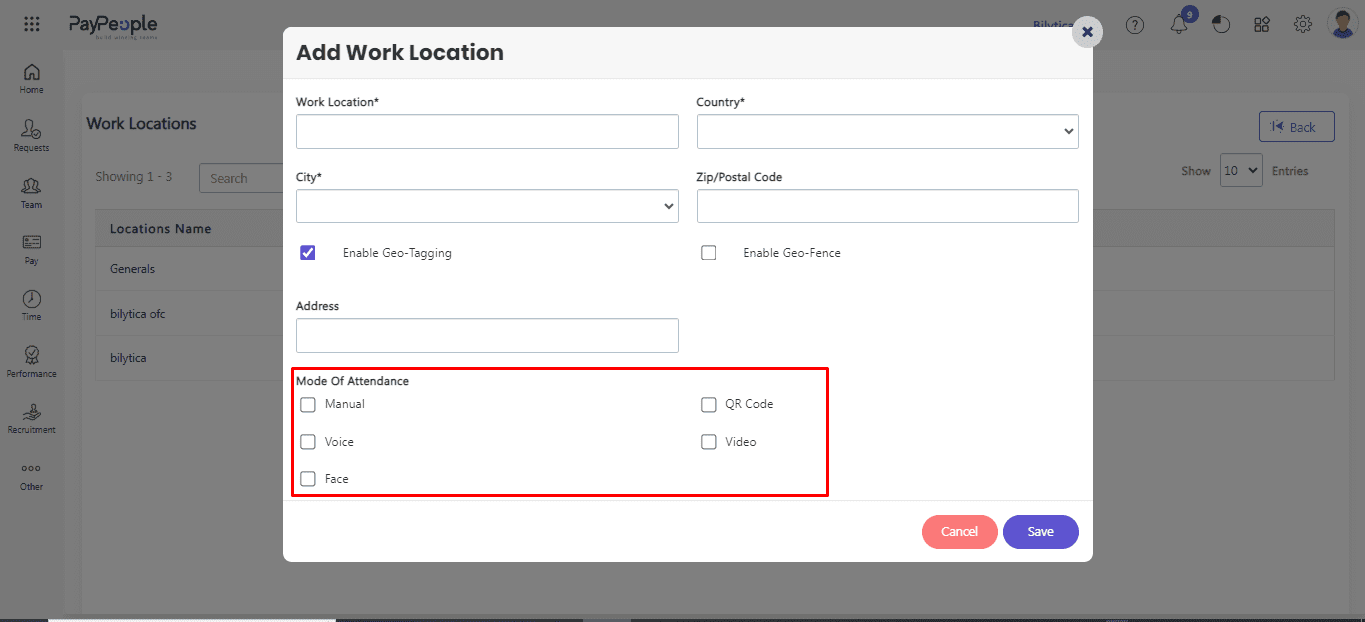
Setting up Work Location #
If your organization has set up a working office in one or more than one location, you will have to create multiple locations. Follow the steps given below for doing this:
- Go to Setup > Organization > Work Locations.
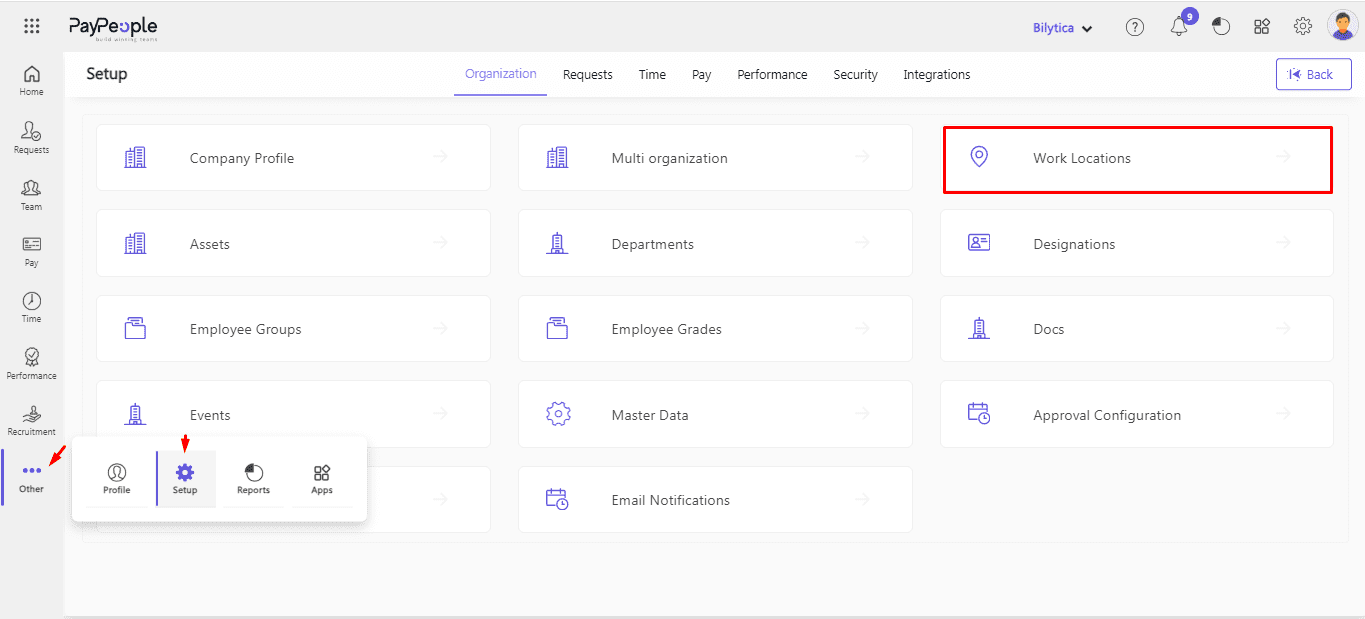
- Select “Create a new” in the top right corner.

- This popup will appear where you can Add your work Locations efficiently by filling in the required information.
- Enter the name of the location. Select country and city.
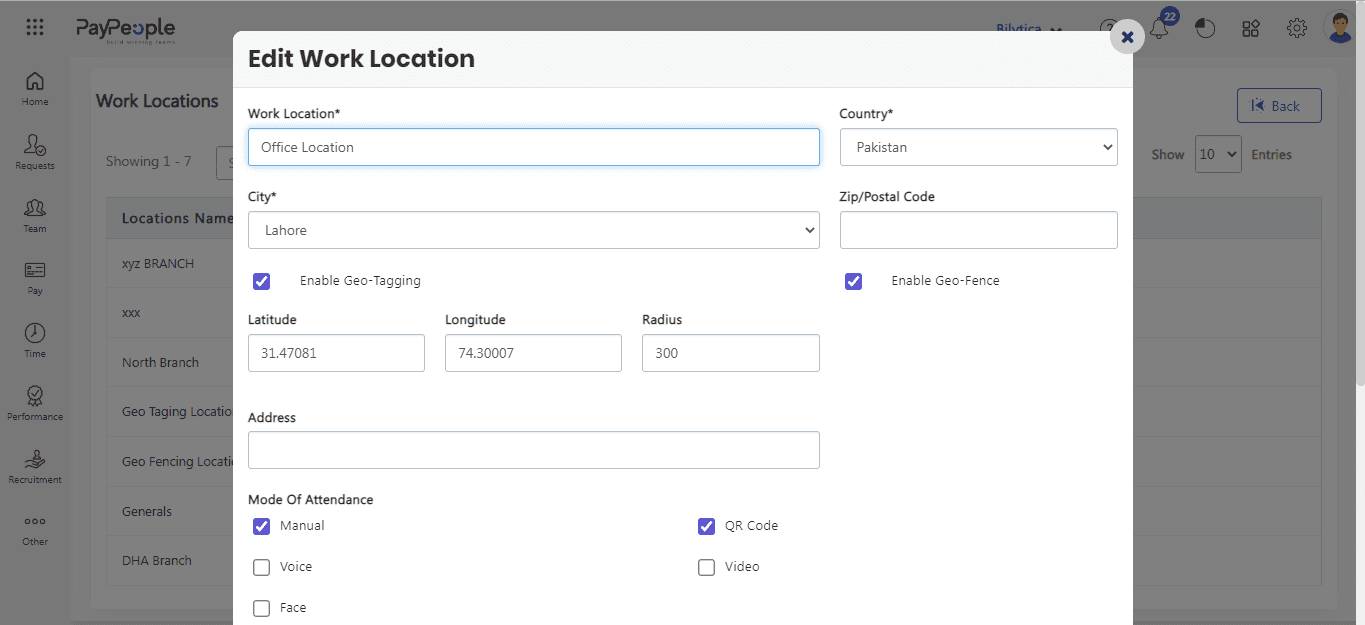
- Select geo-tagging and geo-fencing or both according to your requirements.
Note:
” Enable Geo-Tagging: Geo-tagging is the process of appending geographic coordinates based on the location of a mobile device. Enabling this option will allow your employees to mark their attendance from their mobiles and their current location will be saved.
Enable Geo-Fence: Geo-Fence is also a method for attendance that can be marked by a mobile device. The difference between geo-tagging and geo-fencing is that in geo-fencing the employer has to define the particular coordinates and address with which the user would be able to mark his attendance.“
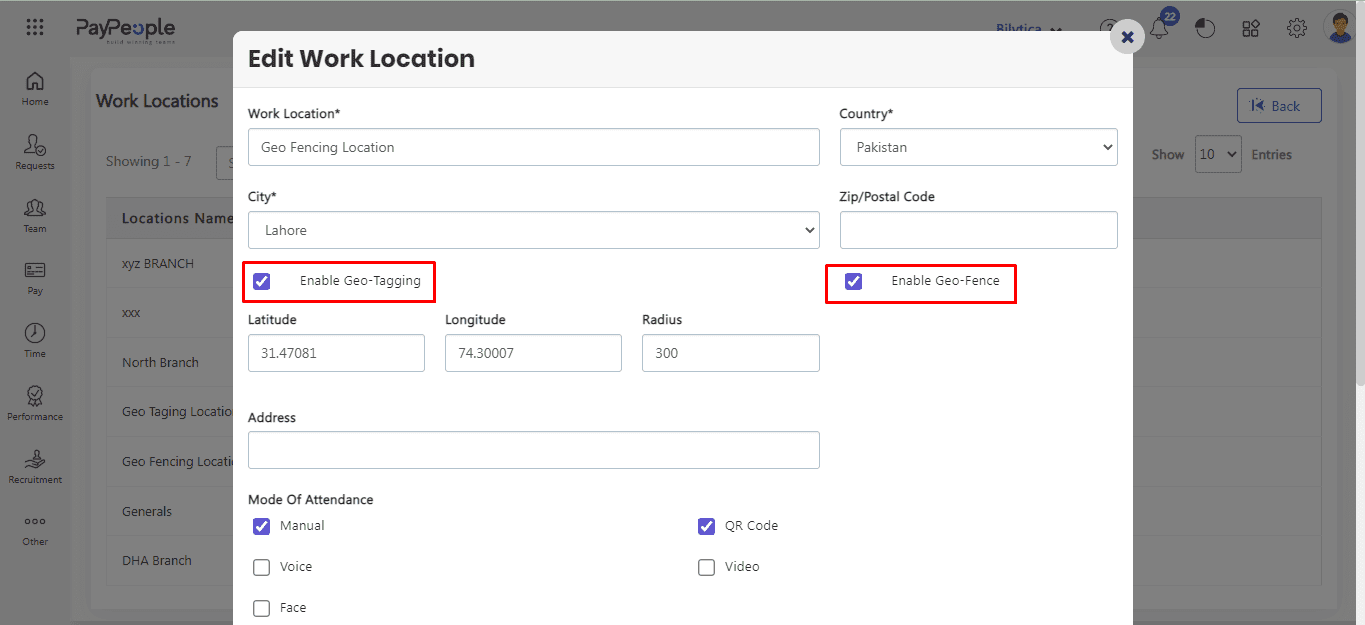
Modes of Attendance #
There are five modes of attendance in PayPeople.
- You can select one or more than one modes you want to allow your employees for marking attendance.
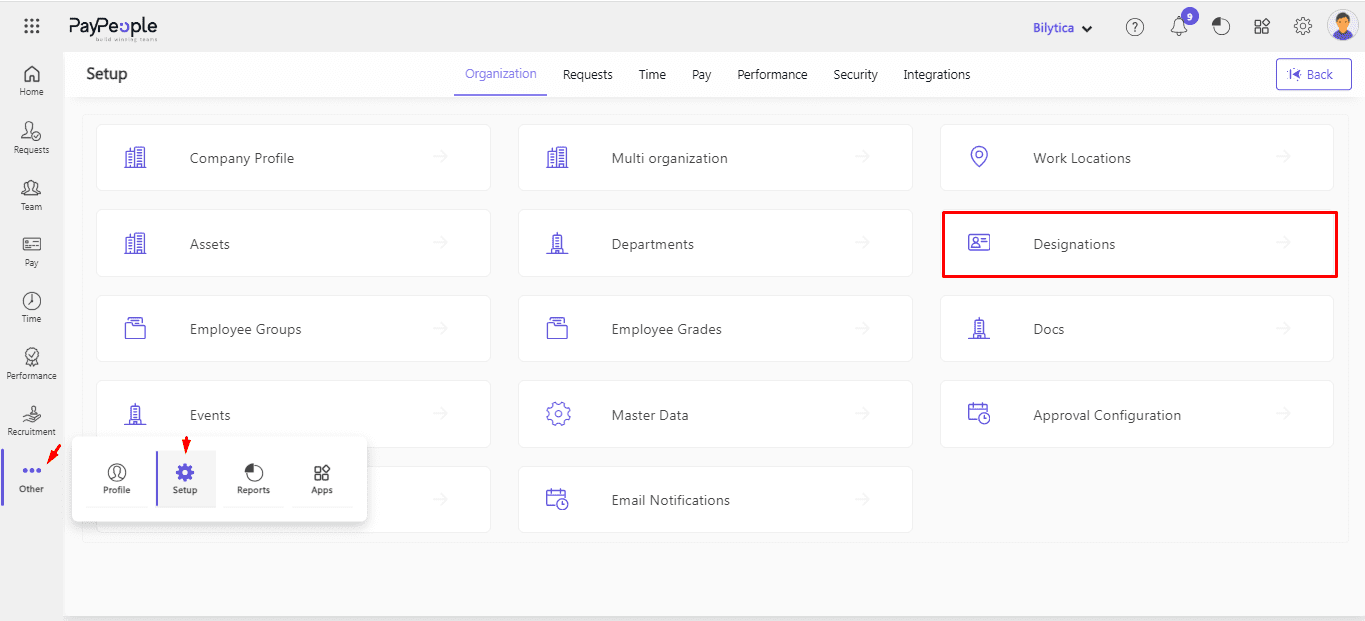
Setting up Designations #
Designations in Paypeople are an essential part of managing your organization’s structure and employee roles. Setting up designations is a simple process that can be done in just a few steps. Here’s how:
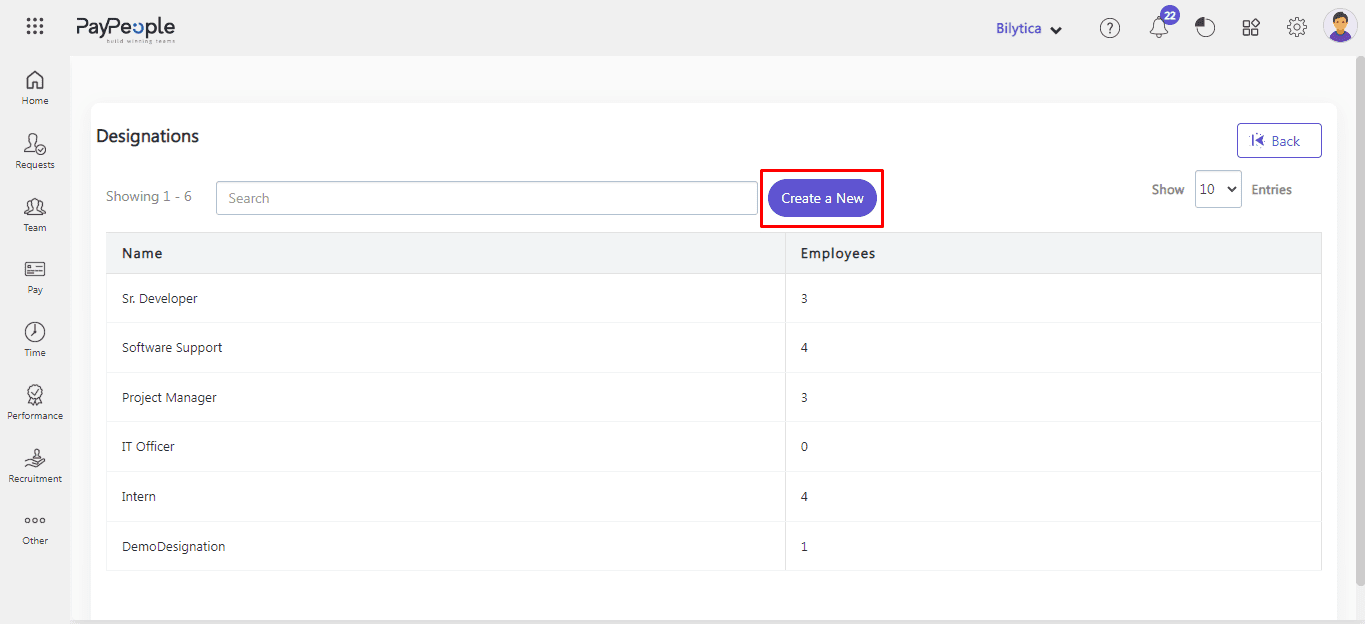
- Go to Setup > Organization > Designations.
- Click on ‘Create a New‘ button.
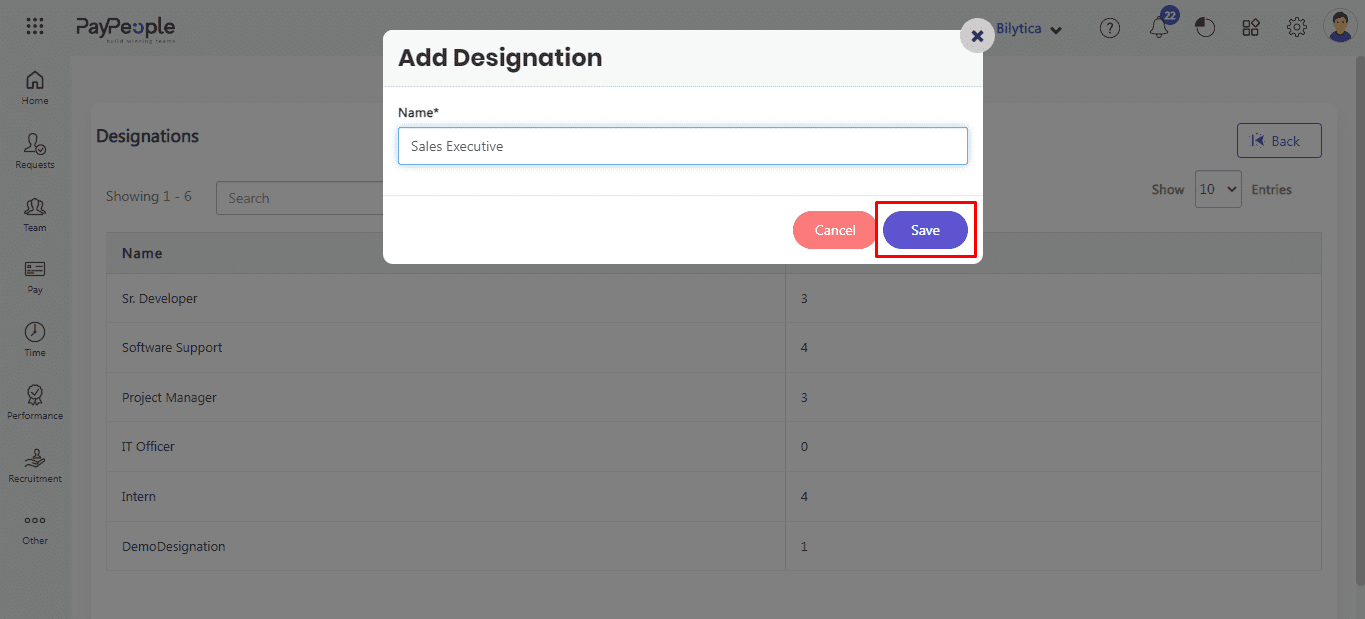
- Enter the Designation Name.
- Click the Save button and your designation has been created and will show on the designations page.
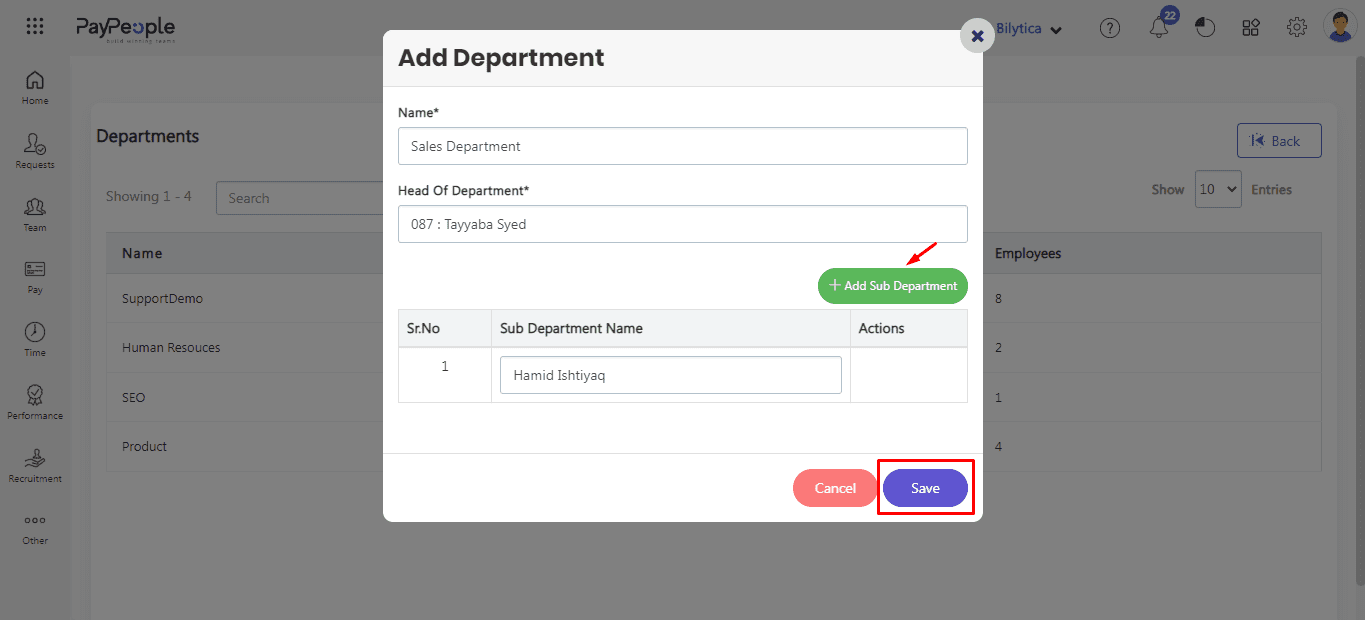
Setting up Departments #
Setting up departments in Paypeople is an essential step in organizing your business and streamlining your operations. Here’s how you can do it:
- Navigate to Setup > organization > Departments.
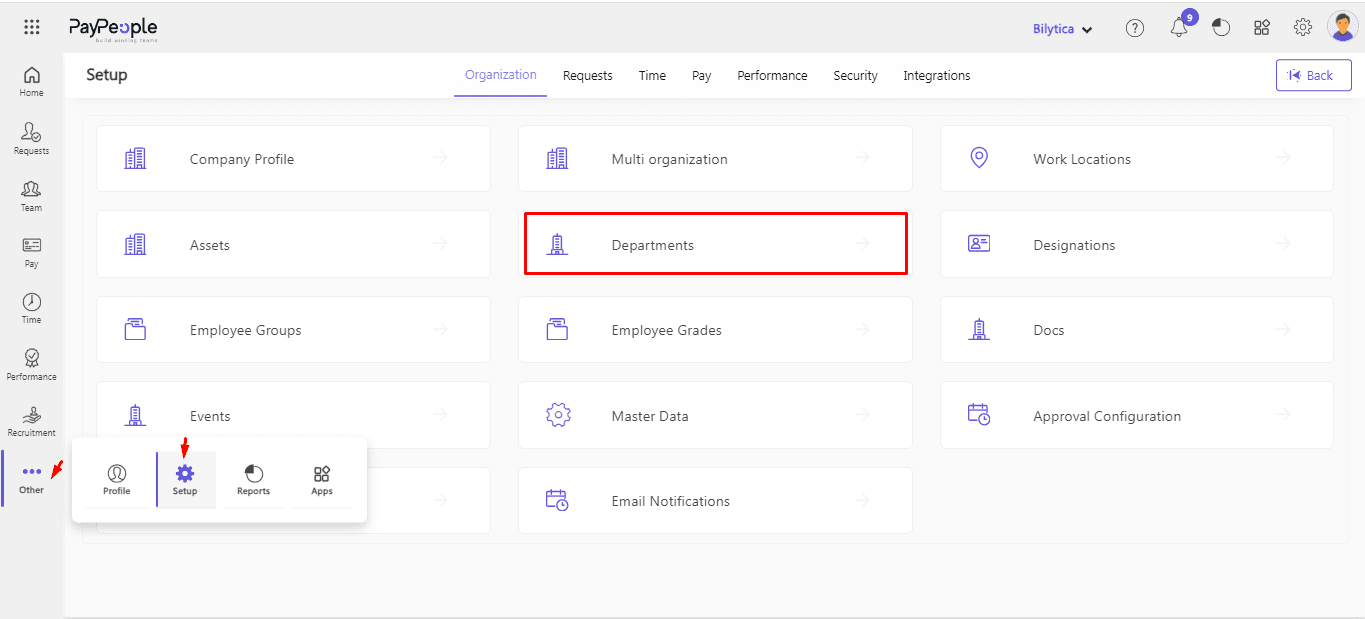
- Click on “Create a New” button
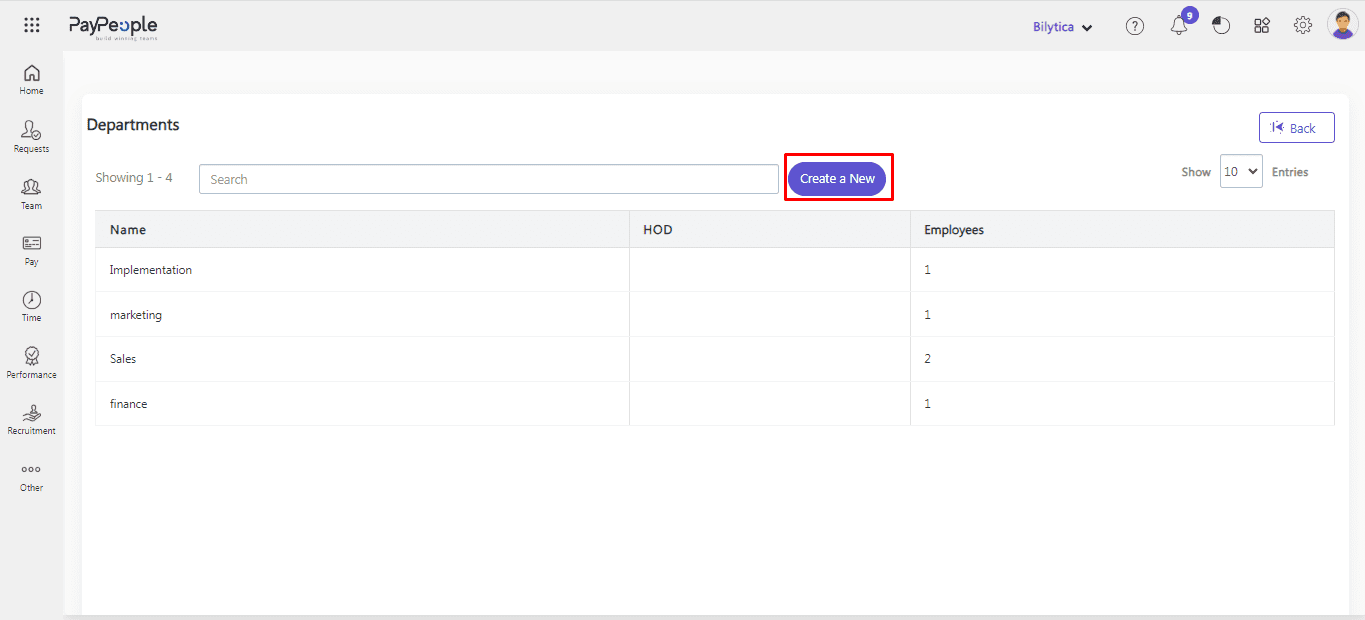
- The poup window will appear.
- Enter the name of the department. You can add head of department.
- You can also add sub department
- Click on “Save”.
- Department will be add successfully and visible on department screen.
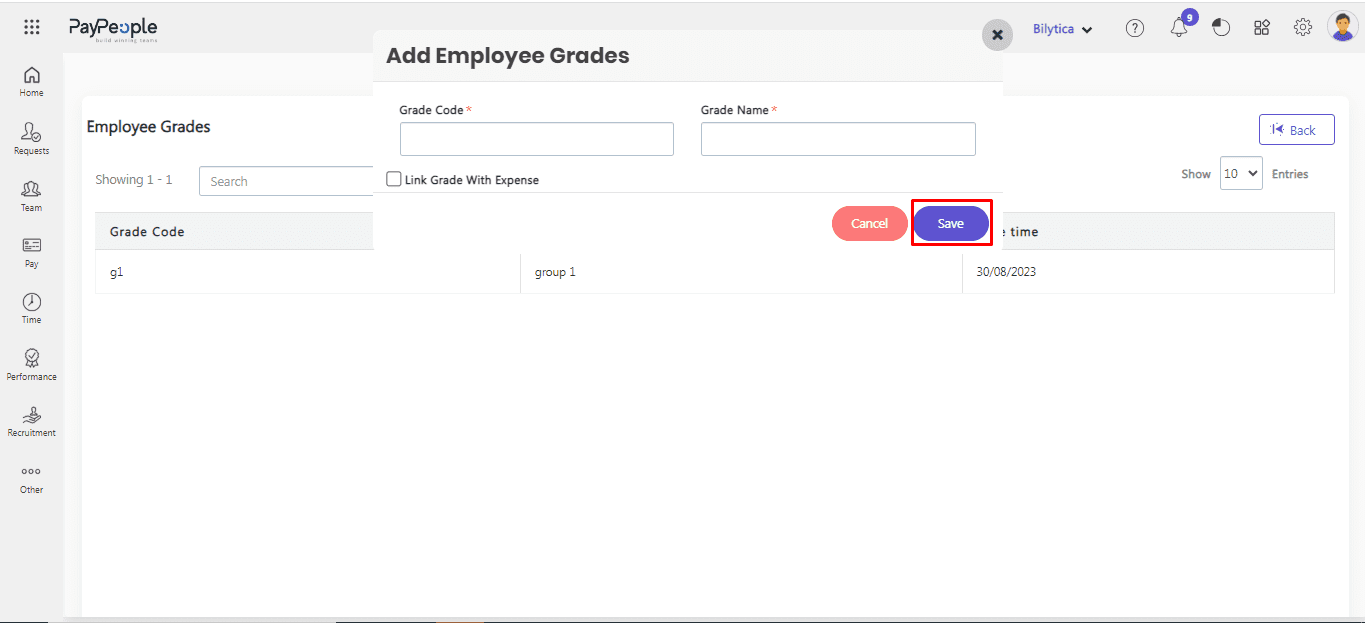
Employee Grades #
Creating employee grades in Paypeople is a simple process that can be done in a few easy steps. Follow the steps below to create employee grades in Paypeople:
- Navigate to the Setup > organization > Employee Grades.
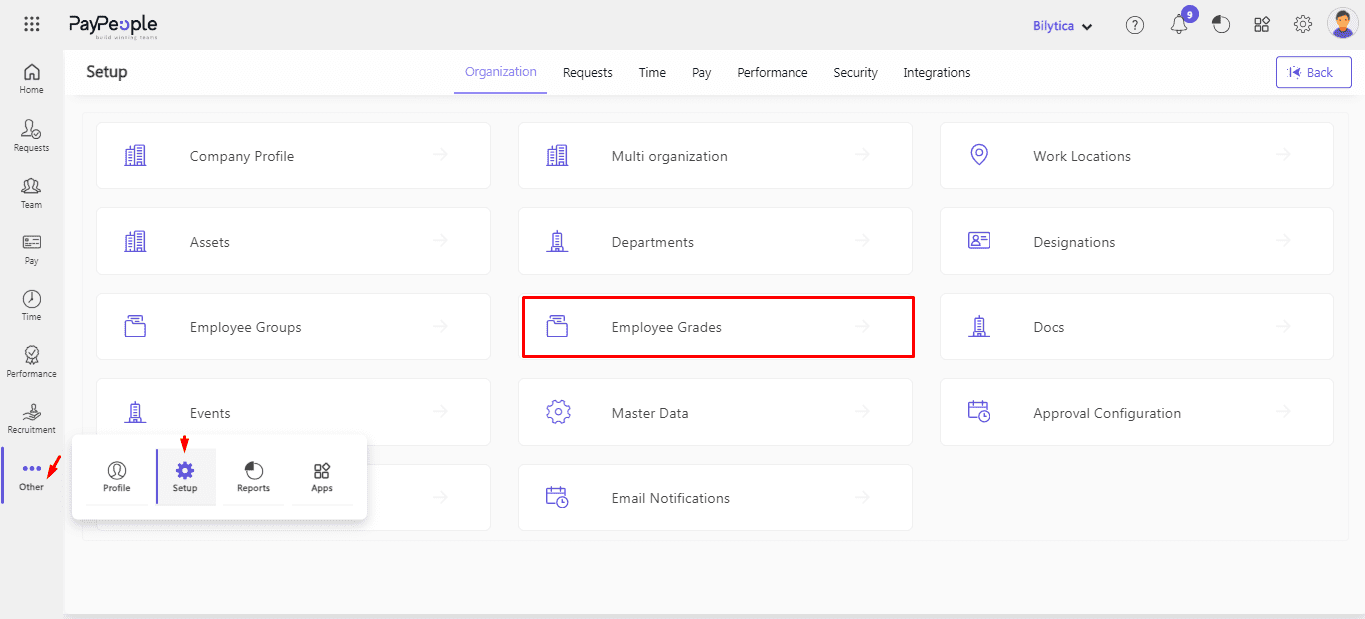
- Click on the “Create a New” button to create a new employee grade.
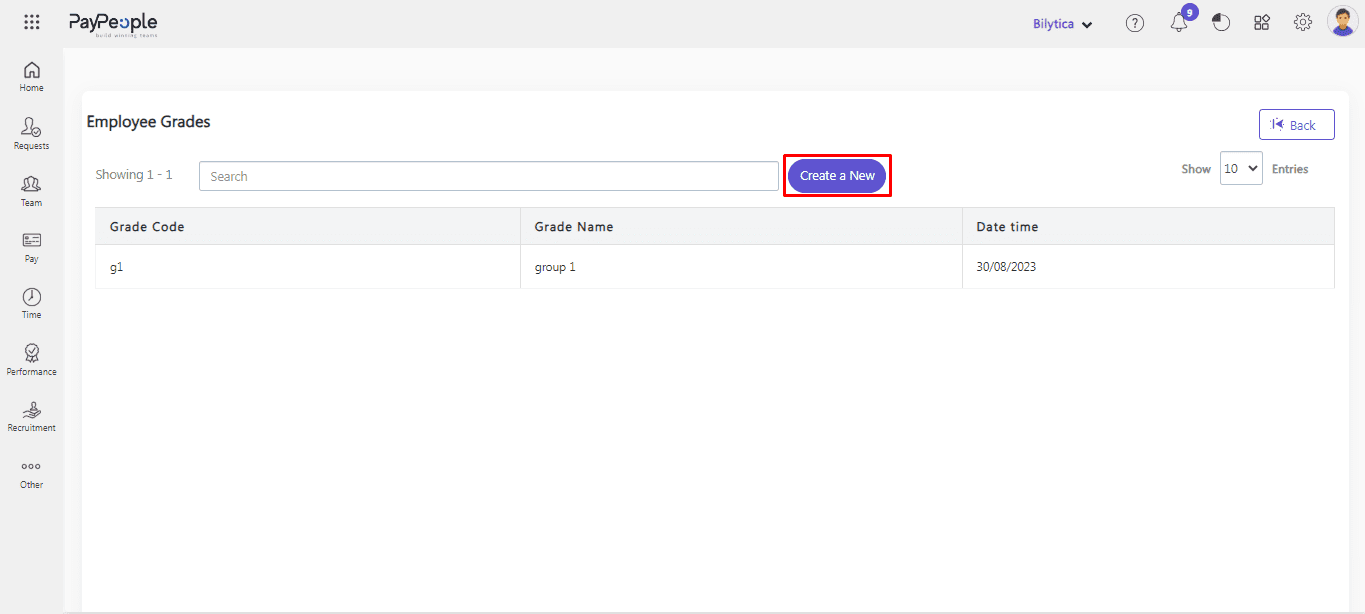
- Enter the Grade Code and Grade Name.
- You can link your created grade with Expense.
- Click on the “Save” button to save the employee grade.
Docs #
Click here to learn about Docs Section.
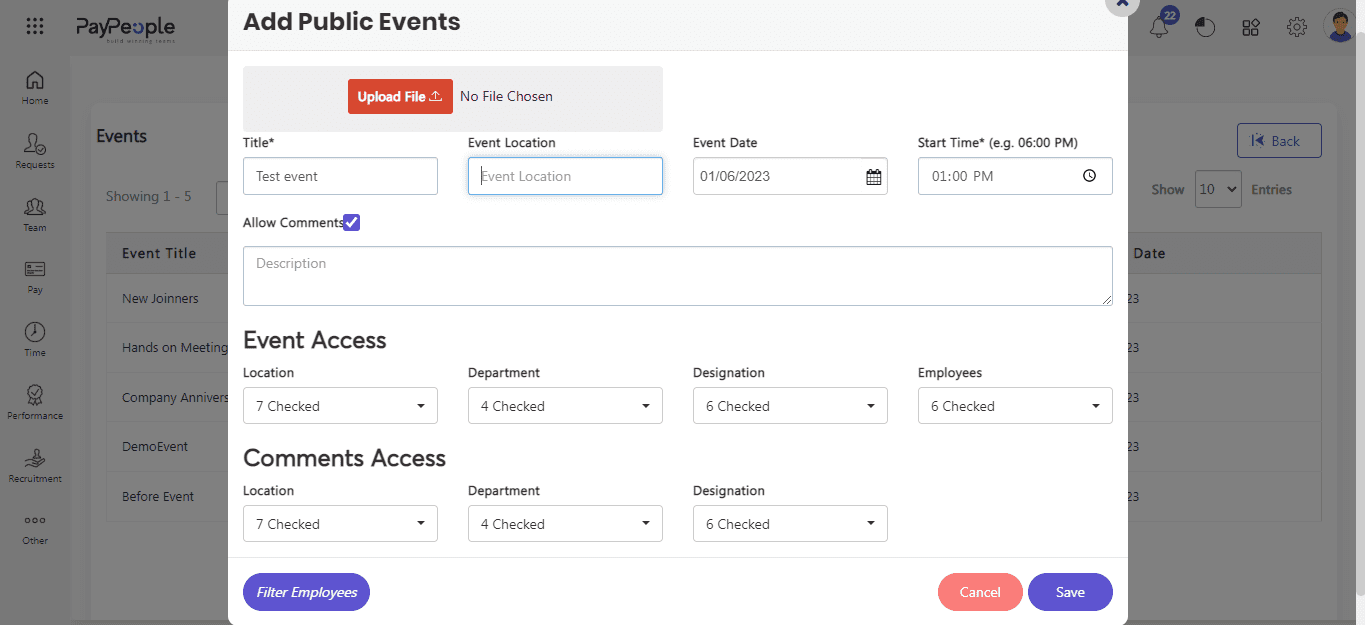
Setting up Event #
Paypeople allows you to add events that will take place within the company in the next few days. The message will appear in the dashboard’s Upcoming Events section.
- Go to the Setup > organization > Events.

- Click on the “Create a New” button.
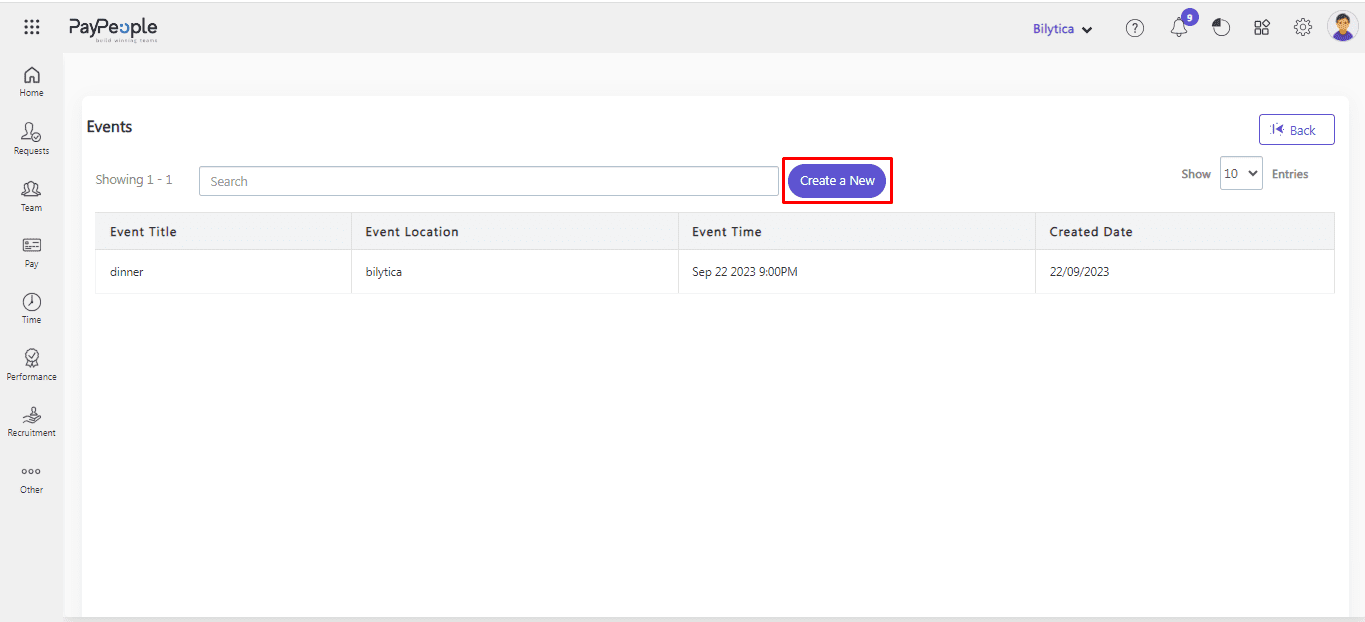
- For an event, you can attach a file and write a description of the event.
- Give the event a title, a location (where it will be hosted), a date, and a time.
- You can send Event Invitations to certain departments, individuals, or the entire organization using Event Access.
- You can allow employees to comment on events to gain feedback.
- Click “Save” button.
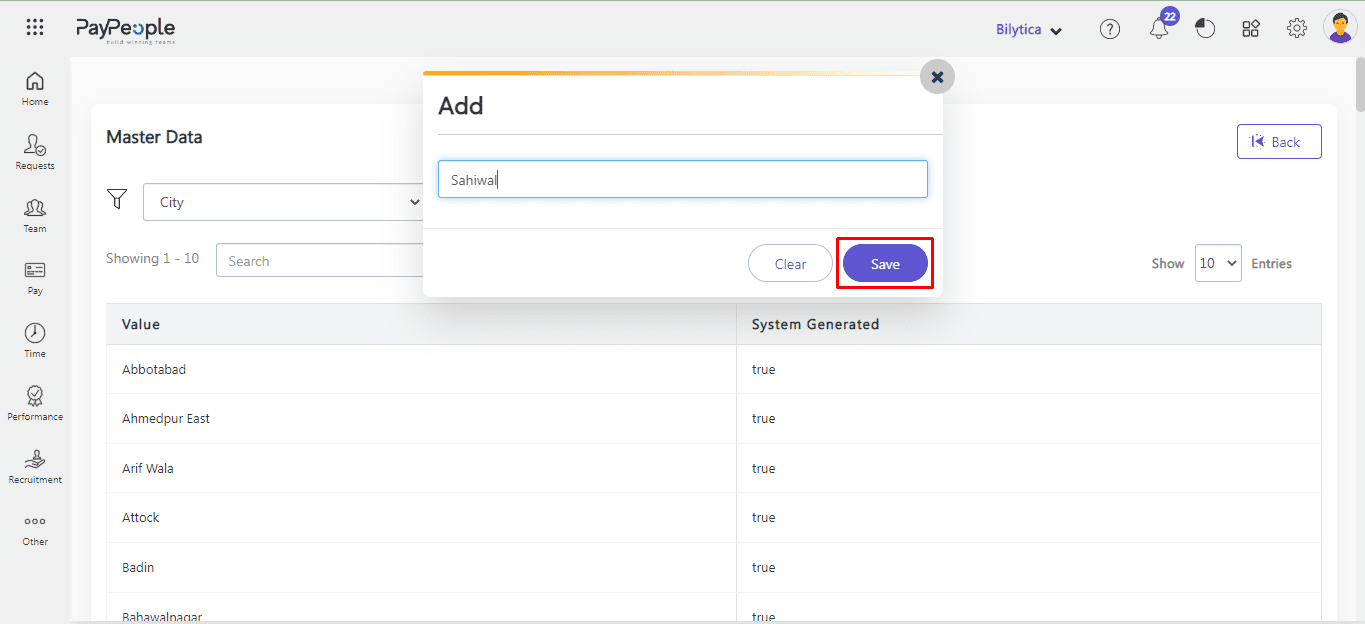
Master Data #
In Paypeople, you can create custom fields by using master data that can be done in a few easy steps. Here’s how:
- Navigate to the Setup > organization > Master Data.
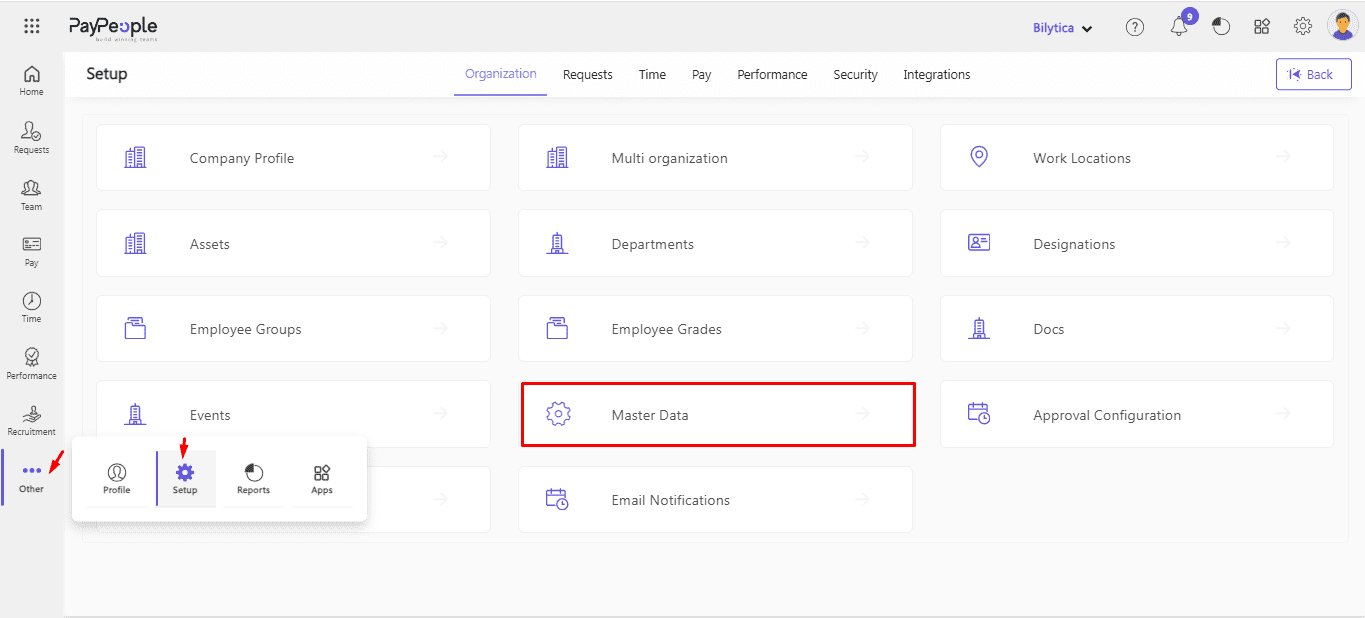
- Select the type of master data you want to create, such as “Country” or “Expense Type“.
- Select value from the drop-down to which you want to add value.
- Click Create a New.
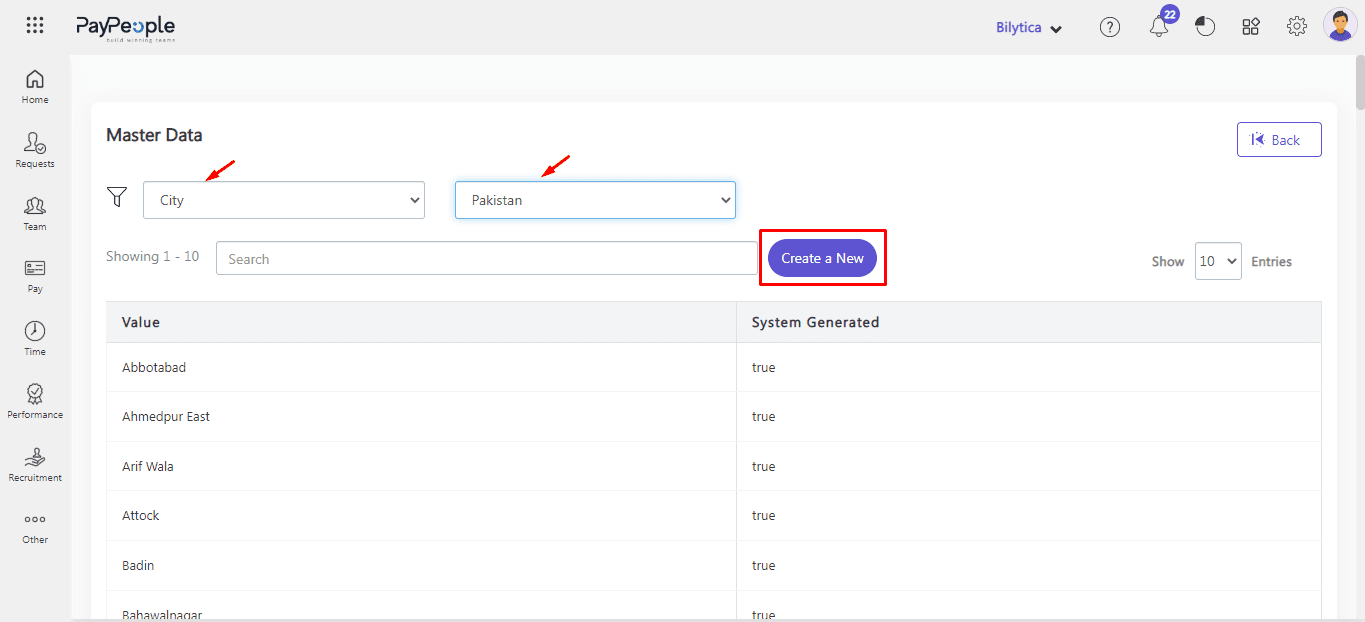
- Window will open write name click Save button.
Approval Configuration #
Approval is a well-defined procedure for obtaining employee consent for official work or special demands. Managers and other members of the hierarchy are frequently involved in the approval process.
PayPeople’s Approvals feature automates the entire approval process and can be used to accomplish a variety of HR tasks.
- Go To Setup -> Organization -> Approval Configuration

- Click on “Create a New” in the top right corner.
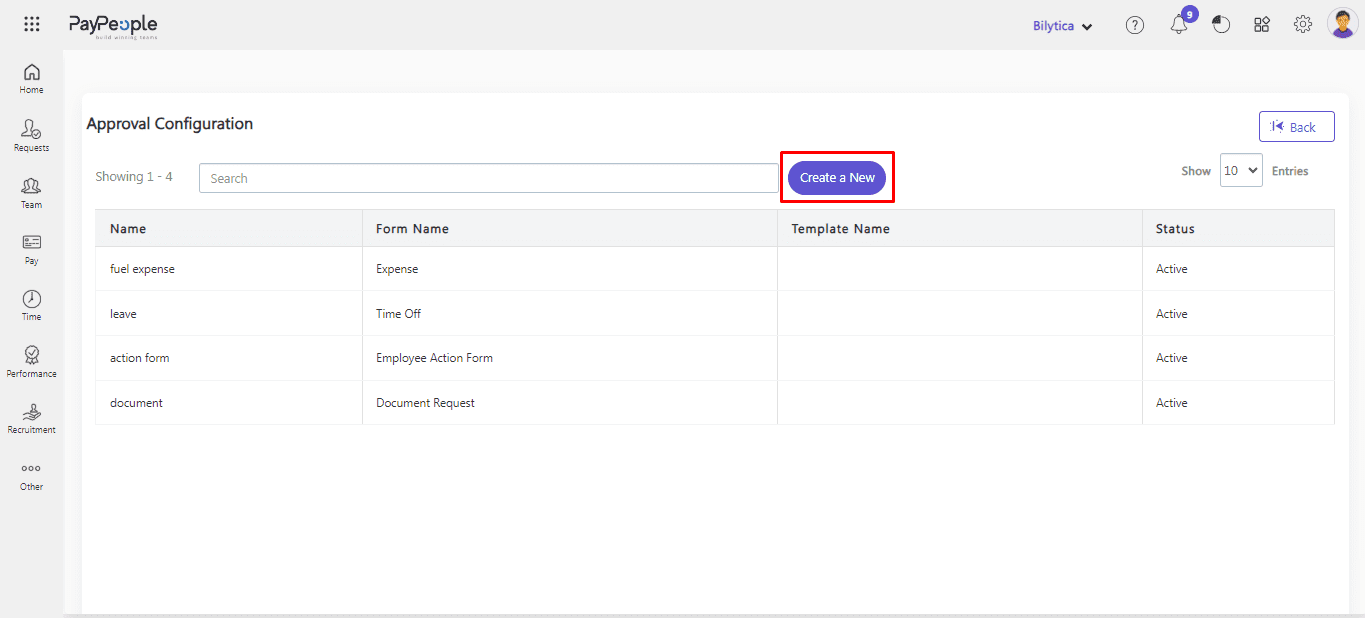
- Fill in the required fields that appear on the screen and click Save.
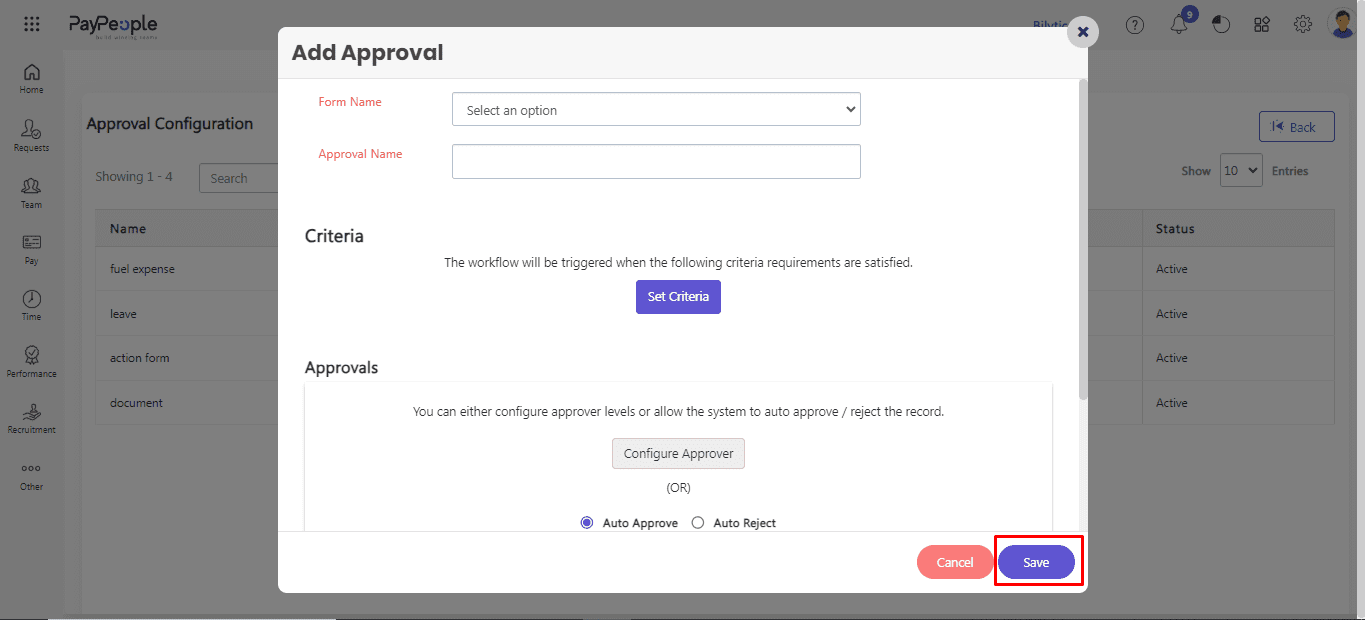
- Enter a name for your configuration and select the type of approval you want to set up (e.g., Time off approval, expense approval, etc.).
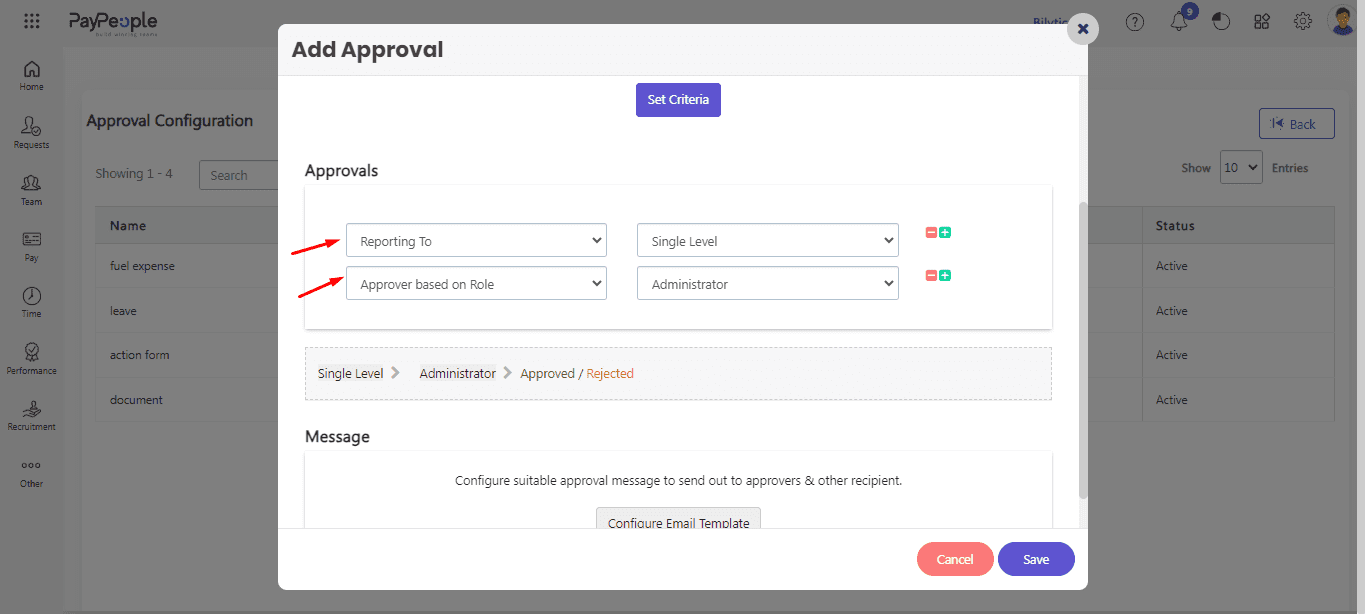
- Define the approval workflow by adding the necessary approvers and setting the approval configuration. You can also set up multiple levels of approval if needed.
- Choose the form for which the approval is being configured and give the approval process a name.
- You can pick auto-approve or auto-reject under Approvals, or click Configure Approver.
- You can select from these approvers: Reporting To, Single and Multiple Level, Approver based on Role, Department Head, Department Members, and Project Manager-based approval.
- If you want the follow-up emails to be sent, add the Message template for approval.
- Fill in the approval message you’d like to add to the email.
- When a request for leave is submitted, standard templates for notification will be required. This is a one-time configuration that can be used based on the details of the corresponding employee.

- You can also upload a document related to the email and attach it.
- Save your configuration by click “Save” button and test it to ensure that it is working as expected.


